How to Detect and Repair Common Refrigerant Leaks: 2026
- 10 hours ago
- 15 min read

TL;DR
Refrigerant leaks are one of the most common and costly problems in HVAC systems, with roughly 90% of AC leaks occurring in evaporator coil copper tubing. Detection methods range from simple soap bubble tests to advanced infrared leak detectors, each with distinct trade-offs in cost, sensitivity, and false positive risk. EPA Section 608 requires repairs within 30 days of discovery, with civil penalties reaching $44,539 per day per violation for noncompliance. This guide covers every step of the process, from recognizing symptoms to choosing the right detection tool, making the repair-vs-replace decision, and meeting federal compliance requirements.
Why Refrigerant Leak Detection and Repair Skills Matter
Knowing how to detect and repair common refrigerant leaks is not optional knowledge for HVAC technicians. It is a legal requirement. Anyone who could reasonably be expected to open a refrigerant circuit during maintenance or service must hold EPA 608 certification. The stakes go beyond licensing exams: improperly handled leaks damage compressors, inflate energy bills, harm the environment, and expose building owners to five-figure daily fines.
This guide is built for HVAC trainees, early-career technicians, and maintenance personnel who need a systematic reference. It walks through the full lifecycle of a refrigerant leak: recognizing symptoms, pinpointing the source, choosing the right detection method, executing repairs, verifying success, and staying on the right side of EPA regulations. If you are studying for EPA 608 certification or preparing for your first service calls, this is core material. For a broader foundation, start with the fundamentals of HVAC/R.
Signs and Symptoms of a Refrigerant Leak
Before reaching for any detection tool, you need to recognize the warning signs that a system is losing charge. These symptoms overlap with other HVAC problems, which makes accurate diagnosis critical.
Reduced Cooling Capacity
The system runs but never reaches the thermostat setpoint. This happens because low refrigerant reduces the system’s ability to absorb heat at the evaporator. It is the most commonly reported symptom, but also the least specific, since dirty filters, failed fan motors, and duct leaks can produce similar results.
Ice or Frost on the Evaporator Coil
When refrigerant charge drops, evaporator pressure falls and the coil surface temperature drops below the dewpoint of surrounding air. Moisture freezes on the coil, further restricting airflow and accelerating the problem. If you see ice on an evaporator, low refrigerant is high on the list of suspects.
Hissing or Bubbling Sounds
A hissing sound near refrigerant lines indicates pressurized gas escaping through a small hole or crack. Larger leaks on the liquid line sometimes produce a bubbling or gurgling sound instead. These audible clues point you toward the general area of the leak.
Oil Residue or Staining
Refrigerant oil travels with the refrigerant through the system. When refrigerant escapes, it carries oil with it, leaving a dark, oily residue around the leak point. During visual inspection, oil staining is one of the most reliable indicators of the specific location.
Higher Energy Bills
A system low on charge runs longer cycles and works harder to maintain temperature. Building owners or homeowners often notice a gradual increase in utility costs before anyone identifies the leak. If a system’s runtime hours are climbing without an obvious cause, check the charge.
Sweet Chemical Odor
Some refrigerants, particularly R-22, can produce a faint sweet smell similar to nail polish remover. This is not always detectable, and you should never rely on smell alone, but it can provide a useful additional clue during diagnostics, especially in enclosed mechanical rooms.
Abnormal Superheat and Subcooling Readings
Practitioners consistently emphasize that superheat and subcooling measurements are the most reliable diagnostic tools for confirming a low-charge condition. High superheat on a fixed orifice system or low subcooling on a TXV system strongly suggests a refrigerant leak rather than other mechanical problems. If you are unfamiliar with pressure diagnostics, the guide on AC testing pressures and performance covers the fundamentals.
Common Refrigerant Leak Locations
Understanding where leaks typically occur helps you search efficiently. Not all components fail at the same rate, and experienced technicians develop a mental checklist of the usual suspects.
Evaporator Coil (The Most Common Leak Source)
According to practitioners, roughly 9 out of 10 AC refrigerant leaks occur in the copper tubing of the evaporator coil. Indoor coils are manufactured with paper-thin copper to maximize thermal efficiency, which makes them inherently vulnerable. Indoor coils leak more frequently than outdoor coils because indoor spaces contain higher concentrations of pollutants.
The primary culprit is formicary corrosion, a chemical reaction between copper, high humidity, and volatile organic compounds (VOCs) found in household products like cleaning sprays, adhesives, and air fresheners. These VOCs combine with moisture to produce formic acid, which attacks the copper at a microscopic level, creating tiny pinholes that are almost invisible to the naked eye but large enough to leak refrigerant steadily. Joints with bad swages where tubing enters the evaporator are particularly susceptible.
For a deeper look at how evaporator coils fit into the overall system, see the complete guide to HVAC system components.
Schrader Cores
Schrader cores are the small valve inserts at service ports where technicians connect gauge hoses. They are, by far, the most overlooked leak source. Practitioners on HVAC forums frequently warn that these cores can stick open after removing gauges, creating a new leak where none existed before. The fix is simple: keep a core removal tool handy and replace any questionable core. It costs pennies and takes seconds, but skipping this step generates callbacks.
Flare Fittings
Flare fittings connect metal tubing to system components. Over time, thermal cycling and system vibration loosen these connections, especially in the outdoor condensing unit where vibration from the compressor is constant. A loose flare fitting often produces a slow leak that is easy to miss during a quick inspection.
Service Valve Caps
The caps on service valves act as a secondary seal. When they are missing, loose, or have degraded O-rings, they become a source of slow leaks that can persist for months before anyone notices. Always verify that caps are present and tight during routine maintenance.
Distributor Tubes
At the evaporator coil inlet, refrigerant flows through a set of small distributor tubes that divide the flow across the coil circuits. These tubes sit close together, and system vibration can cause them to rub against each other over time, wearing through the copper and creating leaks. The YouTube channel AC Service Tech has documented this as one of their top-10 most common leak locations.
Brazed Joints
Properly executed brazed joints are among the most reliable connections in a refrigerant system. But poor technique during installation, such as insufficient heat penetration, contamination, or improper filler rod selection, creates weak joints that may hold for months or years before developing a leak. If a torch is held too close to service valves during brazing, the heat can partially melt internal O-rings, causing the valve itself to leak from the top.
Condenser Coil
Outdoor condenser coils face physical damage from lawn equipment, hail, and debris. They also experience corrosion from environmental exposure, particularly in coastal areas with salt air. While less common than evaporator leaks, condenser coil leaks are typically easier to access and diagnose.
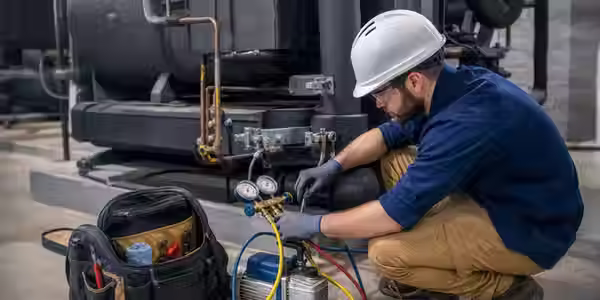
Detection Methods: Tools and Techniques for Finding Refrigerant Leaks
Learning how to detect and repair common refrigerant leaks means understanding that no single detection method works perfectly in every situation. Each tool has strengths, weaknesses, and ideal use cases. The best technicians combine multiple methods.
Visual Inspection
What it is: Examining system components with your eyes (and sometimes a mirror or borescope) for oil residue, physical damage, corrosion, or frost patterns.
Best for: Quick initial assessment. Identifies obvious damage and narrows the search area before using more sensitive tools.
Limitations: Cannot find small leaks or leaks in inaccessible locations. Oil staining confirms a leak existed but does not confirm it is still active.
Soap Bubble Test
What it is: Applying a soap or commercial bubble solution to suspected leak areas and watching for bubbles that form as gas escapes.
Best for: Pinpointing the exact location of a leak after you have narrowed the general area with another method. Many experienced technicians consider this the most effective confirmation tool available.
Limitations: Requires the system to be pressurized. Does not work well on very small leaks or in hard-to-reach areas. Messy in tight spaces.
Practitioner note: Many HVAC technicians on forums prefer soap bubbles over dye for confirmation because, as one commenter noted, “a lot of manufacturers consider the warranty on their equipment void if you use dye.” When a warranty is involved, soap bubbles are the safest bet.
Electronic Leak Detector (Heated Diode)
What it is: A handheld device that draws air across a heated ceramic sensor. When halogenated refrigerant molecules contact the sensor, the device triggers an audible and visual alarm.
Best for: General leak searching across large surface areas. Heated diode detectors set the standard for sensitivity, capable of detecting leaks as small as 1 gram per year.
Limitations: Sensors foul over time and need replacement approximately every 100 hours of operation, according to HVAC School’s testing data. Requires warm-up time. Prone to false positives from cleaning chemicals, solvents, and other halogenated compounds. Practitioners on Reddit report that chemicals stored in a garage can trigger false alarms, and at least one documented case involved a technician misdiagnosing an evaporator coil leak when the detector was actually picking up refrigerant pulled from beneath the unit through a chase leak in the return air path.
Infrared (IR) Leak Detector
What it is: Uses an infrared sensor to detect the specific wavelength absorption pattern of refrigerant gases, rather than relying on a chemical reaction like heated diode sensors.
Best for: Long-term use in environments where false positives from background chemicals are a concern. The sensor often lasts the entire operational life of the instrument.
Limitations: Higher initial purchase price. Still requires methodical technique to pinpoint exact locations.
Why technicians prefer them: The reduced false alarm rate and elimination of frequent sensor replacements make IR detectors a superior long-term investment for technicians who do leak detection regularly, despite the higher upfront cost.
Ultrasonic Leak Detector
What it is: Amplifies the high-frequency sound of pressurized gas escaping through a small opening. The technician wears headphones and scans the system listening for the characteristic hiss.
Best for: Detecting any type of pressurized gas leak, not just refrigerants. Unaffected by wind, refrigerant saturation in the air, or chemical contaminants.
Limitations: May not detect very small, low-pressure, or laminar flow leaks where the escaping gas does not produce enough turbulence to generate sound. Background noise in mechanical rooms can interfere.
UV Fluorescent Dye
What it is: A fluorescent dye is injected into the refrigerant system, where it circulates with the oil. After running the system for a period, the technician scans with a UV light to find glowing dye at the leak point.
Best for: Locating slow, intermittent leaks in systems with long line sets running through inaccessible locations, such as above drop ceilings or inside wall chases. As one HVAC forum contributor put it, dye can be “about your only option for a slow leak” when you cannot physically access the tubing for other methods.
Limitations: Requires time for the dye to circulate throughout the system. Some manufacturers void equipment warranties if dye is introduced. Must be used cautiously.
Nitrogen Pressure Test (Standing Pressure Test)
What it is: The system is pressurized with dry nitrogen to the manufacturer’s recommended test pressure (typically 150 to 250 PSI depending on the system) and monitored for pressure drop over a set period.
Best for: Newly assembled systems, field-piped split systems, and post-repair verification. This is generally the first test performed on new installations. For detailed guidance on test pressures, see the guide on AC testing pressures and performance pro tips.
Limitations: Confirms that a leak exists but does not pinpoint the location. Must be combined with a locating method like soap bubbles or an electronic detector.
Tracer Gas Test
What it is: A small amount of the system’s design refrigerant is added along with nitrogen to pressurize the system. The trace refrigerant makes leaks detectable by electronic leak detectors, while the nitrogen provides safe test pressure.
Best for: Systems that have been fully recovered and need leak testing before recharging.
Important note: The best choice for trace gas is the system’s own design refrigerant. An R-410A system should use R-410A, an R-407C system should use R-407C, and so on.
Detection Method Comparison Table
Critical Best Practices for Leak Detection
The tools matter, but technique matters more. Experienced technicians share several critical practices that dramatically improve accuracy when learning how to detect and repair common refrigerant leaks.
Start at the top, work down. Most refrigerants are heavier than air. If you start scanning at the bottom of a system, your detector may pick up refrigerant that has settled from a leak higher up, sending you to the wrong location. Always begin at the highest point and work your way down.
Move slowly and deliberately. Move your detector probe at about three inches per second. Faster movement creates air currents that push refrigerant away from the sensor tip and can cause you to sweep right past a leak without triggering the alarm.
Verify before condemning a component. When your detector alarms, do not immediately write up a coil replacement. Move the detector to clean air, wait for it to clear, then pass it over the suspected location again. If it alarms a second time on the same spot, you have a confirmed leak. This simple double-check prevents expensive misdiagnoses.
Account for false positive sources. Cleaning chemicals, paint fumes, adhesives, and even refrigerant from a different nearby system can trigger electronic detectors. Be aware of your environment and consider what else might be present in the air.
Repair Methods and the Repair-vs-Replace Decision
Once you have located the leak, the next question is how to fix it. The answer depends on the leak’s location, severity, and the overall condition of the equipment.
Tightening Connections
Some refrigerant leaks at line set fittings, flare connections, or valve packing can be resolved by tightening the connection and recharging the system. This is the simplest and cheapest repair. Always verify the fix with a leak test afterward.
Replacing Schrader Cores and Service Valve Caps
If a Schrader core is leaking, replace it. If a service valve cap is missing or its O-ring is degraded, replace it. These are low-cost, high-impact repairs that prevent recurring slow leaks. Carry spare cores and caps on every service call.
Brazing
Leaks in copper tubing or at brazed joints can sometimes be repaired by brazing with a torch. However, this is only practical when the leak is in an accessible location and the surrounding copper is in good condition. If corrosion is widespread (common in evaporator coils), a single braze repair will likely be followed by another leak nearby within weeks or months.
Component Replacement
Most evaporator coil leaks require full coil replacement. Formicary corrosion rarely creates just one pinhole. By the time you find one leak, dozens of microscopic weak points already exist across the coil surface. The same principle applies to heavily corroded condenser coils and damaged line sets.
The “Topping Off” Trap
Simply adding refrigerant without repairing the leak is a temporary patch that experienced technicians strongly advise against. Repeatedly topping off creates unstable compressor conditions, poor oil return, and accelerated wear. If you are adding refrigerant to the same system more than once in a short period, you are ignoring a mechanical failure that will only get worse.
Repair vs. Replace: A Decision Framework
A useful rule of thumb: if the cost of repairing the leak exceeds 50% of the price of a new unit, replacement is likely more cost-effective. Other factors that push toward replacement include:
The system uses R-22 (phased out, with refrigerant costs climbing)
The equipment is more than 15 years old
Multiple leak repairs have already been performed
The system uses components with known chronic leak histories
For more detailed guidance on Type 2 equipment specifically, see the article on Type 2 equipment leak repair and EPA certification requirements.
Verification: Confirming Your Repair Worked
Repairing a leak is only half the job. Verification is both a best practice and a legal requirement.
After completing the repair, pressurize the system with nitrogen and perform a standing pressure test. Monitor for any pressure drop over at least 15 to 30 minutes (longer for large systems). If the pressure holds, recover the nitrogen, evacuate the system to pull a deep vacuum, and monitor the vacuum for decay. A stable vacuum confirms the system is tight.
Once verified, recharge the system with the correct weight of refrigerant and confirm proper operation through superheat, subcooling, and temperature differential measurements.
EPA Section 608 Compliance: What the Law Requires
Federal regulations under the Clean Air Act govern how refrigerant leaks must be handled. Understanding these rules is essential for every technician, and this material appears heavily on the EPA 608 certification exam. If you are preparing for the exam, review common EPA 608 exam mistakes and how to avoid them.
Leak Rate Trigger Thresholds
The EPA establishes maximum allowable leak rates based on equipment type:
When a system’s calculated leak rate exceeds its threshold, specific repair obligations kick in.
30-Day Repair Window
Owners or operators must repair leaks within 30 days of discovery. Alternatively, they must develop a retrofit or retirement plan within 30 days and complete that plan within one year. For industrial systems requiring a process shutdown, a 120-day repair period replaces the normal 30-day window.
Verification Tests
Systems exceeding the trigger rate must undergo both initial and follow-up verification tests after repair. The follow-up test must be conducted within 10 days of the repair and is compulsory for appliances containing 200 pounds or more of refrigerant.
Recordkeeping
All leak repair activities, leak rate calculations, and verification test results must be documented and retained for at least three years. This applies to both the calculating method used (annualizing or rolling average) and the specific repair actions taken.
2025 Regulatory Changes
As of 2025, regulations expanded the refrigerant management threshold to equipment containing 15 or more pounds of refrigerant, down from the previous 50-pound threshold. High-GWP HFCs including R-410A now face phase-down restrictions under the AIM Act. This means a much larger population of equipment now falls under federal leak repair requirements.
Penalties Are Real
Noncompliance carries civil fines of up to $44,539 per day per violation, potential criminal prosecution with up to 5 years imprisonment, and confiscation of violating substances. These are not theoretical threats. Trader Joe’s agreed to spend an estimated $2 million over three years to reduce coolant leaks and improve compliance, plus paid a $500,000 civil penalty. Another retailer was fined over $400,000 for Section 608 violations.
EPA 608 Certification Is Mandatory
Federal law requires EPA 608 certification for anyone who, in the course of maintenance, service, or repair, could reasonably be expected to open a refrigerant circuit. Working without certification is itself a violation. If you need to get certified or want to brush up before sitting for the exam, SkillCat offers a complete AC and refrigeration certification course with EPA 608 preparation that covers all of this material. Technicians handling motor vehicle AC systems should also review EPA 609 certification requirements for MVAC systems.
Preventing Refrigerant Leaks Before They Start
The cheapest leak to repair is the one that never happens. Prevention strategies focus on reducing the conditions that cause corrosion and catching problems early.
Reduce Indoor VOCs
Since formicary corrosion is driven by volatile organic compounds reacting with copper in humid environments, reducing VOC levels in indoor spaces directly slows coil degradation. Switch to low-VOC cleaning products, ensure adequate ventilation, and minimize use of aerosol sprays near air handlers.
Install UV Germicidal Lights
UV lights installed in the air handler inhibit mold and bacterial growth on the evaporator coil surface. This reduces the biological component of corrosion and extends coil life.
Change Air Filters Regularly
Dirty filters restrict airflow, which lowers coil temperatures and increases moisture condensation on the evaporator. More moisture means more corrosion. A clean filter is one of the simplest and most effective forms of leak prevention.
Schedule Annual Maintenance
Annual system inspections catch small problems before they become expensive ones. A thorough tune-up includes checking refrigerant charge, inspecting connections, verifying Schrader cores and service valve caps, and examining the evaporator coil for early signs of corrosion.
Putting It All Together: The Complete Leak Detection and Repair Workflow
Here is the step-by-step workflow that ties everything together for technicians learning how to detect and repair common refrigerant leaks in the field:
Identify symptoms through customer reports and initial system measurements (superheat, subcooling, temperature split).
Perform visual inspection looking for oil stains, frost patterns, physical damage, and missing valve caps.
Use electronic detection (heated diode or IR) to narrow the leak location. Start at the top, move at 3 inches per second.
Confirm with soap bubbles at the suspected point. Verify twice.
Determine repair approach based on leak location, component condition, system age, and the 50% replacement cost rule.
Recover refrigerant before opening the system.
Execute the repair (tighten, braze, or replace the component).
Pressure test with nitrogen to verify the repair.
Evacuate the system and monitor vacuum hold.
Recharge to manufacturer specifications and verify operation.
Document everything for EPA compliance: leak rate, repair date, methods used, verification results. Retain records for 3 years minimum.
Frequently Asked Questions
What is the most common location for refrigerant leaks?
The evaporator coil accounts for the vast majority of refrigerant leaks in residential and light commercial systems. The copper tubing is manufactured extremely thin for thermal efficiency, and formicary corrosion from indoor VOCs and humidity creates pinholes over time. Schrader cores and flare fittings are the next most common locations.
Which leak detection method is most accurate?
No single method is the most accurate in all situations. For pinpointing exact locations, the soap bubble test is hard to beat. For scanning large areas, infrared electronic detectors offer the best combination of sensitivity and low false positive rates. Most experienced technicians use electronic detection to find the general area and soap bubbles to confirm the precise spot.
How quickly must a refrigerant leak be repaired under EPA regulations?
The EPA requires repairs within 30 days of leak discovery for systems that exceed the applicable trigger leak rate (15% for comfort cooling, 20% for commercial, 30% for industrial). If repair is not feasible, a retrofit or retirement plan must be developed within 30 days and completed within one year.
Can I just add more refrigerant instead of fixing the leak?
Topping off refrigerant without repairing the underlying leak is a poor practice that leads to compressor damage, poor oil return, and unstable system operation. It also violates EPA regulations if the system exceeds its leak rate threshold. If you are adding refrigerant to the same system more than once in a short period, you are masking a mechanical failure.
What changed in 2025 regarding refrigerant leak regulations?
The refrigerant management threshold was lowered from 50 pounds to 15 pounds, bringing a much larger number of systems under federal leak repair requirements. High-GWP HFCs like R-410A also face phase-down restrictions under the AIM Act, making proper leak management and refrigerant conservation more important than ever.
How often should heated diode leak detector sensors be replaced?
Based on testing data from HVAC School, heated diode sensors should be replaced at least every 100 hours of operation. A fouled sensor loses sensitivity and produces unreliable results, potentially causing you to miss real leaks or chase false positives.
Do I need EPA 608 certification to work on refrigerant leaks?
Yes. Federal law requires EPA 608 certification for anyone who could reasonably be expected to open a refrigerant circuit during maintenance, service, or repair. Working without certification is a violation of the Clean Air Act. SkillCat offers a complete EPA 608 practice test and study guide to help you prepare.
How can I prevent evaporator coil leaks?
The most effective prevention strategies target formicary corrosion: reduce indoor VOCs by using low-VOC cleaning products, install UV germicidal lights in the air handler to inhibit biological growth, change air filters regularly to maintain proper airflow, and schedule annual maintenance inspections to catch early signs of corrosion.